

- Scientific Name: Genus Salvia
- Hardiness Zone: Annual, Perennial Zones 5-9
- Days to Harvest: 20-30 days (from date of transplanting)
- Days to Maturity: 2nd Year
- Days to Germination: 10-21
- Seeding Depth: ¼”
- Plant Width: 18-24"
- Plant Height: 18-30"
- Growth Habit: Low-growing and bushy shrub
- Soil Preference: Sandy, loamy, well-drained
- Temp Preference: Temperate, 60-70°F
- Light Preference: Full sun
- Pests/Diseases: Susceptible to rot and mildew in overly moist, poorly drained soil. Does not have too many insects and is generally seeded to help minimize pests.
Growing Sage
Whether growing culinary sage for quick harvesting or more colorful and showy varieties, sage is one of the most versatile and adaptive herbs, able to grow nearly anywhere. Similar to rosemary, oregano, and thyme, culinary sage is an herbaceous, semi-woody perennial grown for flavor and its ability to overwinter outdoors.
Once established in its second year, sage is one of the most vigorous and deeply rooted herbs available. Although sage is frost tolerant and will naturally go dormant during a freezing winter, it is native to the dry and temperate Mediterranean climate and still prefers a warmer 60-70°F during the growing season.
Sage can be grown indoors just as readily as outdoors as either a countertop herb or a fully matured perennial. While Salvia officinalis, or common sage, is technically a variety of humid-loving salvia, these two plants require fairly different conditions and can sometimes be confused for one another.

How to Grow Sage from Seed
- No cold stratification needed
- Cover with no more than ¼” soil
- Keep soil warm during slow germination
Unlike other perennial herbs, lavender and rosemary, sage seeds do not actually require a period of cold stratification and germinate just fine without. Many home gardeners traditionally cold stratify all of their herb seeds before the spring and, although not entirely necessary, storing seeds in a freezer will still help maintain and boost germination rates.
If starting indoors, a standard T5 6500K full spectrum light is always recommended for the most optimal starts, while not costing a fortune. Salvia officinalis is an ideal herb for both indoor and outdoor container gardening and, if intending to transplant to a pot, trying sowing sage seeds directly to begin perennial growth.
For earliest and healthiest starts, begin sage seeds indoors 8-10 weeks prior to final regional frost. In warmer grow zones, sage can be sown outdoors in the fall for early spring germination.
Plant 2-3 seeds .25” deep per individual cell or about 3-4” apart in the garden in sandy, loamy, and well-drained soil in full sun.
Although mature sage plants prefer some drought, keep germinating seeds moist and warm, approximately 6-8” from grow light.
Once sage seeds germinate in about 7-21 days, thin to 1 plant per container or every 18-24” in the garden as true leaves establish.

Sage Soil
Common sage is a Mediterranean native and still very much prefers the average, shallow, and dry soils from the region. Like thyme, sage is synonymous with arid, rocky hillsides and lowlands not suitable for many crops. And like most of the Mediterranean herbs, sage is susceptible to root rot, mold, and fungus in damp, saturated, and poorly drained soils.
Sage is so persistent that it typically doesn’t require much fertilizer or amending but, for an early boost, add some light composting or worm castings to soil when first transplanting. The added nutrients will help establish the start without compromising flavor.
Beware of heavy fertilizer use throughout the season because, although it may help boost vegetative growth, fertilizer ultimately diminishes herbal flavor.
Watering Sage
- Less is more
- Drought tolerant
- Allow soil to dry between waterings
The greatest threat to any perennial sage plant is overwatering, as Salvia officinalis is highly susceptible to root rot and mold in consistently wet and saturated soil.
Sage seeds benefit from evenly moist soil to begin germination but, once sage has sprouted true leaves within about 14 days, allow the soil to begin to dehydrate and dry between waterings. Remember that sage is native to the dry hillsides of the Mediterranean and naturally thrive in similar gardens.

Whether growing outdoors in the garden bed or indoors in a container or pot, allow the top two inches of soil to completely dry before watering so that the roots and soil are more receptive to the water rather than having it pool up and saturate the plant.
Is Sage A Perennial?
An emphatic, yes! Sage is a frost tolerant perennial to zones 5-9 with a 4-5 year lifespan and is an ideal companion crop alongside other overwintering favorites lavender, rosemary, and thyme to just name a few.
Sage seeds are often grown alongside many similar herbs that have the same soil requirements and overwintering tolerances. Although sage leaves may seem tender and delicate to the touch, mature sage plants boast a thick and woody stem able to withstand some subzero conditions, depending on variety. Sage simply goes dormant during the winter and continues vegetative growth as soon as spring warmth returns.
Salvia officinalis does not thrive in overly warm, humid summers nor will it overwinter in gardens that sustain lengthy subzero conditions. Growing sage in pots to bring it indoors for overwintering is one of the most efficient and convenient ways to grow sage to its full 4-5 year potential.

Sage in Winter

- Dormant in freezing winters
- Frost hardy to 10-20°F
- Prune back in early spring
Whether left outdoors in the frost or brought inside for the season, there is more than one way to keep sage alive through the winter.
Established sage plants undergo a winter dormancy in hardiness zones 5-9 as they can endure frost, snow pack, and even some subzero conditions.
Sage grown specifically for culinary use is recommended to be grown in pots to be brought inside to winter.
Outdoor sage plants that develop the necessary woody base and stems for overwintering are generally not as flavorful, tender, or fragrant as indoor plants protected from the elements.
Growing Sage in Pots
Because sage requires average, sandy, and well-drained soil, it is known to thrive in planters, pots, and containers both indoors and out. For some moisture-loving herbs such as mint, containers are not ideal because they are known to quickly drain and dry soils.
Garden sage, on the other hand, requires the thorough and reliable drainage offered by moveable pots. Containers are widely recommended for many perennial herbs that can be brought indoors to overwinter.
Sage plants brought indoors for the winter will maintain more tender, fragrant, and better tasting leaves than those left outdoors throughout the frost. Potted sage grown as an ornamental will benefit from a regular fertilizing, helping to promote vigorous color and growth.
However, if growing sage for strictly culinary use, avoid any use of fertilizer except for when first preparing the soil for transplanting. Routine fertilizing will produce abundant vegetative growth while greatly diminishing flavor and edibility of sage leaves.
How to Care for Sage Plants in Pots

- Naturally thrives in pots
- Overwatering is the greatest threat
- Try terra cotta pots for best drainage
If transplanting sage seedlings to a portable container, then prepare the soil with equal parts perlite and sand while adding a little worm castings or compost for an early boost.
As mentioned, sage grown in pots generally thrives without any amending or fertilizing but, for establishing transplants, feel free to add a balanced nutrient blend. Allow soil to thoroughly dry before watering and move plants around throughout the day to best capture optimal sunlight.
Sage grown in pots and containers require the same amount of pruning as sage cultivated in the garden bed to best reach its 4-5 year potential. Overwatering is the greatest threat to sage plants grown in pots and containers.
Growing Sage Indoors
In colder grow zones, sage is popularly brought indoors at the first frost and kept inside until the weather warms back up to about 35°F or better. Some varieties are more suited for the frost than others. For some gardeners, indoors just might be the best place to maintain sage.
Aromatic, soft, and showy, garden sage is grown just as popularly as an ornamental as often as it's grown for culinary use. Regardless of which cultivar of Salvia officinalis you grow, all sage requires the same dry and warm Mediterranean conditions which, for many plants, can be satisfied with any full sun window.
Growing sage in pots and containers is the most convenient way to move indoor sage from window to window to capture some of the day’s transient sun. Although full spectrum T5 6500K grow lights are useful for germinating seeds and starts, nothing will ever substitute quality sunlight.


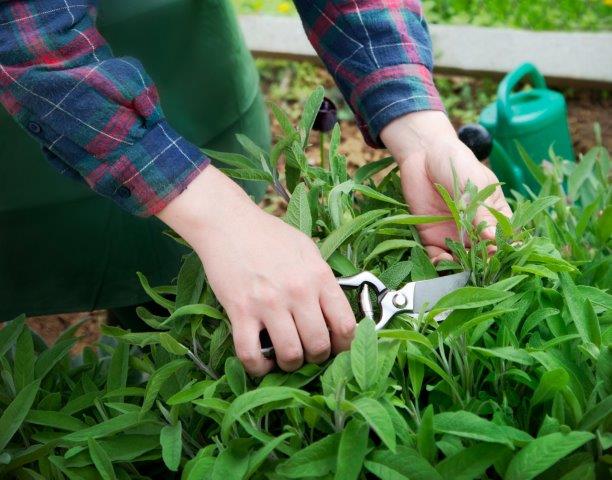
Pruning Sage
Although intimidating for beginners, regular pruning and harvesting is one of the best ways to establish a perennial sage plant for its entire 4-5 year lifespan.
Almost as essential as sun and water, regular pruning helps your sage plant quickly produce healthy and abundant growth during the warm seasons.
Depending on climate, pruning can be a scheduled occurrence in the spring and summer months or, for much warmer southern regions, sage may be pruned as needed throughout the year to help shape the plant for its intended grow space.
Whether growing safely indoors or left to mature out in the garden bed, sage will benefit from routine pruning to keep the woody base from continuing up into the harvestable and edible stems. Pinching and pruning young sage starts within their first year will help establish a shorter, bushier, and more robust plant, focusing more energy on flavor and fragrance than vegetative growth.
When to Prune Sage
- After winter dormancy
- Throughout season as needed
- Late summer in regions with warm winters
Climate, hardiness zones, and specific cultivar will determine how often sage must be pruned. The first trim of the season is likely to happen in early spring after all threat of frost has passed and the sage plant is no longer dormant.
Salvia officinalis left to winter outdoors should always be pruned in the spring to rid it of its protective woody growth while helping to promote new, tender stems for the warm season.
Growers in warmer hardiness zones are free to prune sage as needed to keep up with fast seasonal growth.
Many gardeners will take the opportunity to both harvest and prune their herbs all from the same cuttings, ensuring that nothing is wasted from either process.

If growing in cooler northern climates, do not prune sage in late summer or fall, potentially risking pruning off too much growth to sustain it for freezing winter conditions.
How to Prune Sage
- Prune about ⅓ of green growth
- No more than 20% of total plant
- Do not prune down to bare stems
Depending on the size and age of your sage plant, pruning directions will adjust.
Younger plants that have yet to develop a woody base can be pruned down to nearly 80% from the original size, while larger plants should only be pruned of about 20% of their tender new stems, never the wooded base.
Using garden shears or scissors, simply give your sage plant a “haircut” to evenly round and shape it, being sure to only ever clip from the softer newer growth. Pruning is only difficult the first time you do it.
Propagating Sage
Regardless of variety, culinary or ornamental, sage is one of the many herbs in which it is easier and quicker to grow from a cutting rather than starting from seed.
Sage is a much larger seed than lavender, rosemary, or mint and actually much easier to grow, with germination known to be as quick as 7 days. Of course, the benefit to growing from seed is that you can grow completely new and exciting varieties, while clones can only ever come from established plants.
Gardeners may take several seasons to decide which variety of sage is best for them but, once decided, they will allow the plant to establish so it may provide seasons worth of unique clones for family, friends, or farmers’ markets.
Whether propagating using either a hydroponic or soil-based method, try cloning sage from cuttings to best understand the tenacity of the perennials within the mint family Lamiaceae.
How to Grow Sage from Cuttings
1. Depending on size and age of the plant, an ideal selection for sage propagation is to cut the top 5-8” of a fresh young stem with plenty of soft green and no signs of flowering.
2. Take the clipping and strip about half of it bare of its leaves. Most soft cuttings should be about 5-8” long, stripping exactly half of the sprig for rooting.
3. The final step of propagating sage from cuttings allows for two different methods to root the new cutting. The simplest method simply has you plant the bare end of the cutting into soil, allowing the remaining leaves to collect light for establishing new root structure. However, some gardeners prefer to root sage cuttings in a glass of water by saturating the stem up to its leaves. Once roots are established in 3-4 weeks, the sage clone can be safely transplanted.
4. If propagating sage hydroponically in a glass of water, be sure to change out for fresh water and a new glass every 5-7 days to avoid mold. If propagating sage cuttings directly into soil, rooting hormones and gels are popularly used to incite growth, but are not required.

Sage Companion Planting
Like rosemary, basil, and catnip, common sage is traditionally grown as a fragrant and beneficial herb widely believed to help deter troublesome pests and insects during the season. In fact, some organic mosquito repellants feature sage oil extract as a leading ingredient.
While sage is one of the most popular herbs used to detract insects, when allowed to go to flower, sage also proves to be one of the most attractive blooms to beneficial insects and pollinators. Sage can often be found growing in tandem with other overwintering herbs rosemary, lavender, and thyme due to their similarities in use, size, and tolerances.
Sage is traditionally believed to repel cabbageworm and rustfly and is often grown alongside broccoli, cabbage, cauliflower, and carrots. Growing a diverse herb garden is one of the best ways to help support your local bee population.

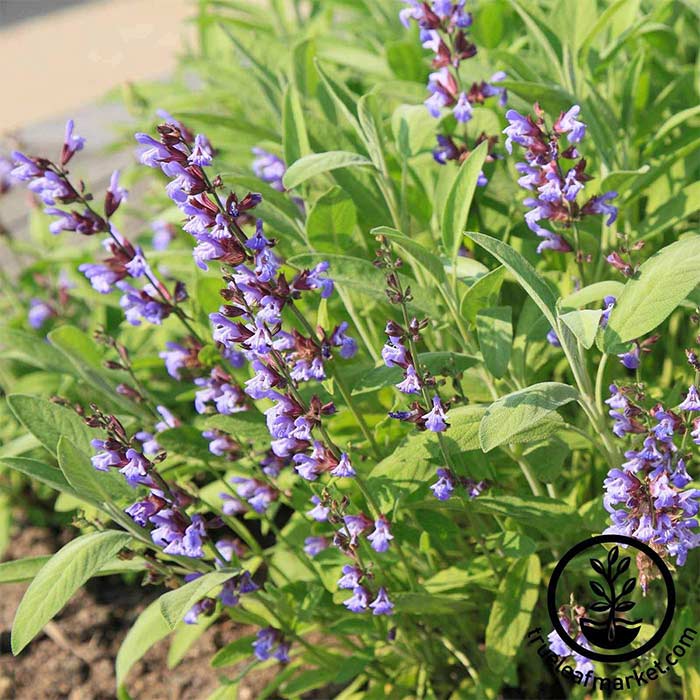
Sage Flowers
Every species of sage is technically a member of the Salvia genus, the commercially popular ornamental found in nearly every shopping complex, mall, and retail space in even remotely semi-humid regions.
And just like the salvia plant, sage produces tall upright blooming stalks brimming with small trumpet-shaped florets. While ornamental sage is commonly grown for its unique and colorful vegetation, garden sage left to flower will prove to be as exciting and decorative as its ornamental cousin.
Sage flowers boast an eclectic array of soft white, lavender, blue, and pink.
Generally, the brightest and most tropical looking sage blooms, like Scarlet Sage (Salvia splendens), is more accurately classified as true Salvia, more accustomed to the humid tropics than dry and arid sage shrubs.
Sage flowers do not thrive in fresh cut arrangements, bouquets, and centerpieces, yet make for a world class ornamental when kept in the garden to bloom.
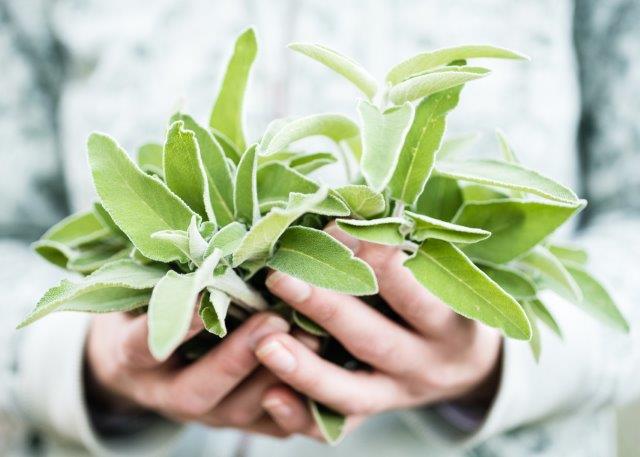
Harvesting Sage
Sage leaves are soft, velvety, and very similar to Lamb’s Ear, an absolute delicacy of a leaf when compared to some other perennial herbs. Many home cooks will keep common sage growing indoors or out on the patio for fresh use any time of year. Harvesting sage leaves is easier than lavender blooms or rosemary sprigs and many growers will often save their efforts by pruning and harvesting all at the same time.
Although common sage (Salvia officinalis) is harvested almost exclusively for culinary use, white sage (Salvia apiana) is recently experiencing a renaissance as an essential addition to herb gardens across the country. Regardless of which sage cultivar, newest and most tender growth will always provide the most flavorful and fragrant leaves.
When to Harvest Sage
- Year-round as needed
- Spring and summer in cool regions
- Prune, propagate, and harvest together
How to Harvest Sage
- Use scissors or shears, never pull
- Harvest the top ⅓ of non-flowering stems
- Same as pruning, cut above the woody base
As mentioned, harvesting and pruning herbs are almost always done in tandem because they rely on the same exact cuttings from the same tender growth. Whether pruning or harvesting, always choose cuttings from the more green and tender stems and never from the tough, woody base where growth has ceased.
If only needing a sparing amount, then leaves may be individually clipped from the most tender stems. If intending to dry, choose the size and length of clippings based on the dehydrating method you choose.
Drying Sage
Common sage (Salvia officinalis) and white sage (Salvia apiana) are two of the most popular herbs in the entire world and they’re both a sage plant.
Whether dehydrating a personal amount of sage for cooking, tea, or smudge sticks or bulk quantities for resale, the same general principles are followed as with any garden herb. Regardless of preferred drying method, be sure to remove the individual leaves from the fibrous and tough stem, which can prolong drying and cause bittering if dehydrated.
Sage is susceptible to mold and black leaf spotting if left to dry in poorly ventilated and humid conditions. Check each leaf for black spotting or any discoloration that could affect flavor or aroma after drying. Sage leaf is as easy to dry as any other herb, requiring nothing more than a little patience and darkness.

How to Dry Sage
Hang Dry: Cut about 5-8” of newest growth per stem and then bundle together. While larger plants will yield longer stems, still harvest just the tips for best flavor. Hang the sage bundle upside down in a dry, cool, and well-ventilated area for 7-14 days until soft leaves are brittle and no longer pliable.
Oven Dry: Sage stems can be easily placed on a baking sheet and dehydrated in a convection oven at 160° F for 20-30 minutes or until leaves and stems are brittle. Open the oven door every 5 minutes to vent some heat. After 20-30 minutes, turn off the oven and allow sage leaves to remain in the oven for another 30 minutes, leaving the oven door open to cool.
Food Dehydrator: Herbs, fruits, and flowers are ideal for countertop food dehydrators for reliable and thorough drying. Food dehydrators feature step-by-step instructions for herbs and is the preferred method for many cooks and home gardeners. Many herbs such as sage should only take about 2 hours in any household food dehydrator.
Types of Sage
The genus Salvia which had been most famous for its tropical and semi-tropical ornamentals is actually a much broader genus than one understood, as it is home to both sage and rosemary.
Both sage and “true” salvia share very similar habits, leaf structure, and blooms and are often confused for one another. While there is still much debate as to deciding which cultivars of Salvia are herbal and which are ornamental, there is no debate that sage is as popular as it's ever been.
Varieties such as White Sage (Salvia apiana), Blue Sage (Salvia clevelandii), or Black Sage (Salvia mellifera), and Lavender Sage (Salvia leucophylla) have become internationally prized as essential herbs for smudge sticks and burning. Common sage (Salvia officinalis) is still the industry standard for flavor and culinary use, but is not a preferred variety for any type of incense burning.
Despite the rise in popularity, many of these exotic varieties of sage are still difficult to find in greenhouses and nurseries and generally only cultivated by the home gardener.


Common Sage: (Salvia officinalis) - Widely regarded as the most preferred cultivar of sage for its flavor, aroma, and tenderness, common sage is the variety you can expect to find in grocery stores, nurseries, and greenhouses throughout the country. Salvia officinalis is the culinary standard for dried spices and herb blends and is so prevalent that it is just simply referred to as “sage”.
Broadleaf Sage: (Salvia officinalis) - A variation of the internationally celebrated common sage, broadleaf sage grows a much wider leaf for enhanced flavor and harvesting. As a close relative to ornamental salvia, many varieties of Salvia officinalis are known to have some slightly thinner leaves, similar to their ornamental relatives. Broadleaf sage generally grows so wide and fuzzy that it can be mistaken for another famous garden ornamental, Lamb’s Ear (Stachys byzantina).

Benefits of Sage
Whether eaten raw, brewed into an herbal tea, or burned as part of a smudge stick, sage has been one of the most prominent and nearly universal herbal remedies.
Herbs in the Lamiaceae family such as mint and lavender are celebrated for their antioxidant properties, known to help rid the body of unwanted free radicals.
When grown in the garden along with similar perennial herbs, sage is widely attributed to helping remedy some pests and insects. The same potent and aromatic chemicals that are extracted for essential oils have been found to create toxic and inhospitable environments to some harmful garden pests.
Sage Tea

Just like with cooking, be sure to harvest only common sage or any variety of Salvia officinalis for the most flavorful and fragrant leaves.
Although beautiful and popular in their own right, other varieties of sage are better left in the garden than the tea pot.
Sage is a member of the mint family Lamiaceae and blends perfectly with relatives mint, lavender, and thyme.
Be sure to completely strain any sage leaves from the tea before drinking to avoid any bitterness.
Try dried sage leaves with ginger root, licorice root, and gingko for a truly potent herbal blend. Brewing tea allows the benefits and calming effects of sage to be more readily digested.
How to Make Sage Tea
1. Using any type of tea infuser, satchel, or tea bag, add about 4 tsp of dried sage to every 8 oz of boiled water.
2. Allow sage to steep for about ten minutes. Done!